Monday, April 16, 2012

The Year Round Wreath


Okay, I lied...it's not really a wreath.  I suppose it's more a door hanging.  Regardless, I created this Pinterest inspired  door hanging and LOVED it.  I saw the picture on Pinterest and sort of just made up how they did it.  I'm sure there's an original tutorial floating around the world wide web somewhere...but here's what I've got.


I don't have any pictures of me creating this bad boy because I made it a few months ago when I was anti-blog.  But it's pretty easy and straightforward, so really pictures aren't necessary.  It's really just a time consuming pain in the butt more than anything else.

First, I started with a cardboard N from JoAnn's.  Similar to the R I used for The Big R project. Here's a pic of the cardboard R so you know what I'm talking about:


Then I grabbed a few other supplies:
- Twine
- Hot glue gun with a few sticks of glue
- White Glue
- Foam Brush
- Ribbon
- Scrap fabric for my flowers

I started by hot gluing the twine to the back of the N on one end - just basically to adhere it to the N.  I also hot glued a small strip all the way around the bottom of the N and attached the twine all the way around (so it wouldn't slip off the end as I started wrapping)  Then I brushed glue onto the N on all sides, about an inch at a time.  Once I had my glue brushed on, I just slowly and carefully wrapped the N, trying not to miss any places.  Every couple of inches I put another dab of hot glue on the back of the N to hold my twine into place.  My thought process was that I needed something that would immediately hold the twine in place so it wouldn't all unravel and white glue takes a while to try.  However, the hot glue can be a bit goopy and doesn't hide as nicely as the white glue, so that's why I only used it in small glops on the back of the N where it would be hidden.  There may be a few tricky parts where the twine doesn't quite line up on your letter, so you really just have to play around with it.

Here's a close up of the wrapped twine.  I had to get a little creative to get the twine to cover every bit even though it wasn't perfectly lined up.


Once I had the whole letter wrapped, I made sure to finish it off with another glop of hot glue on the back so the whole thing wouldn't unravel before the white glue dried.  Then I used white glue to attach a ribbon to the back of the N to hold it onto the door.  I've found that sometimes hot glue won't hold stuff for as long, so I felt like the while glue was the best option.  I also covered the exposed tops of the N by wrapping the twine around the edge of the top section and getting it into a smaller and smaller circle until every bit of cardboard on the top was covered.  I added some extra white glue to the exposed ends to make sure they wouldn't unravel.

For the flowers, I just used some scraps of cream fabric and found a fabric flower tutorial online.  Basically you take a long strip of cream fabric and twist one end of it so it's skinnier.  Then you just start rolling it around, and let it get a little looser as you go so that it opens up like a flower.  I made sure to hot glue it together as I went so that it wouldn't all unravel on me.  It took a few tries to get flowers that I liked, but I think they turned out pretty good.  Once I had a few good ones, I just glued them onto the N.  Finally, glue on a bow and you're done!


Make sure everything can dry overnight before you try to hang it on your door.  I've had mine up for a few months and it's still in great condition.  It's also really light weight and shouldn't scratch up your door paint (like our Christmas wreath did!).

Good luck!

Sunday, April 15, 2012

Greeeeeeen Acres is the Place for Me

Well, I've decided to embrace the country girl in me and settle into small town living - which for me means gardening.  I've been working with a local organization to start a community garden in our city park, and we're finally up and running!  I've written a couple of grants for us which has gotten us over $6000 in funds we plan to put toward building a pergola, getting some equipment, and a shed to store it in.

Today Chris and I went out and planted my little 10'x10' plot and I'm pretty happy with how it went.  I know NOTHING about gardening, so I sort of just made it up as I went.


It's sort of hard to tell with this picture, but we used stake and twine to lay out some rows so we'd know what is supposed to be growing where.  Here's a better picture of the stakes:


Then once we laid those out, I just put a different vegetable in each row and tried to follow the directions on the seed packets.  I have beans, carrots, lettuce, tomatoes, cucumbers, and peas.  I made a little map so I'll know what's coming up where.


Once we finished up with our garden, we came back home and I planted some marigolds in some planters to flank our garage.


And now...my fingernails are super dirty and I'm really tired.  But I've had chicken in the slower cooker all day for some shredded chicken tacos and I think it's about that time!

Thursday, April 5, 2012

Now I know what to eat!!

What???  Two blog posts in a row???  Don't get used to it...but I've been building up some post-worthy material, so here goes.
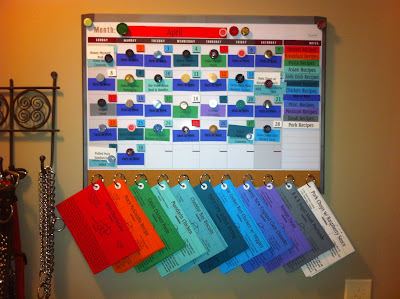
I created a FABULOUS new menu board with the hopes of revolutionizing our lives.  This post really isn't meant to be an advertisement (I didn't get anything free for posting, and we all know I don't have enough people reading this blog for me to start getting sponsored!) but I just really loved this board and wanted to give props where they are due.  So without any further delay, here's more about the awesome Menu Board I created a few weeks ago.

We've only been using it for a few days, but here's a few things I've already noticed.

(1) I actually knew what to buy at the grocery store (made a list in advance).
(2) I'm cooking meals...not just crap out of a box.
(3) I know when to thaw something out so that it will be ready for dinner.  In the past, I'd regularly get home, realize I didn't thaw out any meat, which would mean time to eat out and/or order pizza.
(4) I've realized I'm a terrible cook.  I'm not real great at following recipes and have sort of already screwed a few of these up.  BUT, I'm trying and I think I'll get better over time.  And I learned that pork chops don't need to bake at 350 degrees for over an hour...unless you want really dry, overcooked pork that requires a huge gulp of water to get down.  The great news is that Chris patiently ate it and pretended like it wasn't terrible, and agreed that the flavor was awesome and probably just needs to be cooked for a little less time.

So here's the finished product:


See, the organization, color coordination, all of it really appeals to my OCD nature.  I got the awesome idea from Robin over at RobbyGurl's Creations.  She has a great tutorial here that goes through everything from where to get the materials to how to use the thing.  I purchased her Menu Board Files - she emails them to you within a day or two (I think mine came within a few hours) and she's already compiled and formatted a number of recipes.  Plus it's a good template to add your own recipies and categories.  Do you need to download the files to create the menu board?  Probably not.  Should you download it to create the menu board?  Absolutely.  It saves a ton of time and only costs a few bucks ($3.99 plus tax).  Plus, she designed the whole concept so I was happy to give back to her in the process.

Here's a few things I did a little bit differently so this board would work best for our needs:

I changed the colors up a little bit.  They're still pretty bright but we don't have kids so I didn't want anything too crazy in the middle of our house.

I also used buttons on the magnets instead of the acrylic jewels that Robin uses.  I actually made two of these menu boards and I'm giving the other to my sister.  My sister's menu board has acrylic jewels on the magnets because she has kids and they will love the sparkle.  Chris and I weren't super keen on the jewels because it just didn't really go with anything else in our house, and of course I have a decent button collection so I went through and picked out some that were about the same size as the sticky magnets and stuck them on instead.

With Chris' job, he unfortunately has to miss dinner about half of the time, so I created a category for that and marked those days accordingly so that I wouldn't be picking out full meals for those nights.  I then pulled a fee simple meals (such as BLTs) and put them on the left side of my board under the categories.  I'll use these as fillers (along with leftovers and frozen meals) for the evenings Chris is at work.

I found the majority of the supplies, including the white board calendar, at Wal Mart which is where Robin said she was able to find them.  I was thrilled i was able to find the same calendar because I love having a section for the catgories, the magnets, and then the cork board strip across the bottom.  We didnt' use a ribbon to hang ours and instead drilled two small holes on the top corners and just put screws through them and screwed it straight into the wall.  Then I put some magnets on top of the screws to cover them up.

So, if you have some free time this weekend and a desire to get your meals organized, then seriously head over to RobbyGurl's Creations and learn how to make this menu board.  I've since purchased her Cyber Specialities file which is another 1,000 recipies.  I will probably slowly print them out and add them to my board over time.  It adds a few more categories and a ton more options (great for a picky fiance).

Wednesday, April 4, 2012

Eeek, how long has it been?

I am officially a terrible blogger.  I never update.  I say I will.  And I don't.  But in my defense...here's what I've been up to!


We got our engagement pictures taken!  Yay!  And then we ordered some save the dates, which should be arriving in the mail shortly. 


I found a great listing on Etsy for our Save the Dates - http://www.etsy.com/listing/84147459/diy-printable-storybook-wedding-photo.  It was only $20 for her to crop our picture and add the text and turn it into a postcard (front and back) then I uploaded the file onto vistaprint and got 100 postcards for $25..not too shabby.

I also have started the process of ordering invitations.  This wedding will be happening in no time!

Oh, and this happened....


I'm a pretty diehard KU fan, so having a rebuilding year team make it to a championship game, and then give an NBA-esque Kentucky team a good fight in the second half, really made my year.  Basically, if KU basketball is on TV then everything else just comes to a stand still in our house.

I've also been pretty busy selling stuff on Etsy - I've gotten multilpe custom orders for my Birthday Boards.  I've sold 3 in a week and a half, so I'm pretty stoked.  Yeah, I used the term stoked.


Here's a custom board I'm just finishing up.

So see, I have been busy.  It wasn't a lie.  But I'm also working on getting some more posts up here.  I made a menu board that is already changing our lives...well kind of.  I mean I went to the store and had a grocery list and have starting cooking more meals at home.  For us, that's life changing.