A lot of my inspiration came from lilblueboo.com - you really need to check out this amazing blog if you haven't already.
Here's what you'll need to make your own:
- an old suitcase, hat box, or some container that will hold your little village
- newspaper/paper towels
- flour and water (and a bowl to mix it up in)
- paint (I used a mixture of spray paint and craft paints - just whatever I already had)
- miniature birdhouses (available at Michaels and JoAnn's for $1 each)
- a dremel or small handsaw to cut the doorways out of the birdhouses
- modpodge and glue
- various items to accessorize (I used pennies, scrabble tiles, buttons, little rocks, scrap booking papers and old maps, miniature flowers and flowerpots, leaves from old fake plants, etc.)
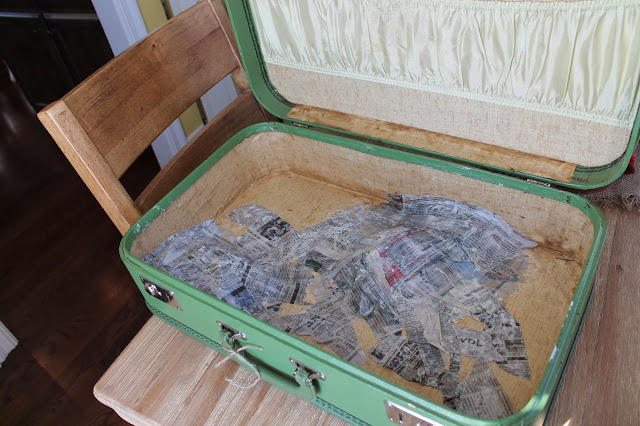
Start by preparing your item to become a little village. I created paper mache with a mixture of flower and water (I don't boil it, I just mix flour and water until I have a nice soupy mixture). Then I crumpled up newspapers to make little hills in the village and cover with strips of paper mache newspaper to create your hills. I also used crumpled paper mache newspaper pieces all over the bottom of my suitcase to make the ground have some texture.
Here's what my hills looked like still just a wet heap of newspaper. Doesn't look like much until you paint it.
Once your paper mache hills have dried and you're happy with them, then you'll need to paint the entire inside of your suitcase. As you can see, mine looked pretty gross inside before I painted it. I used spray paint so I masked off the outside and parts I didn't want spray painted really well before I started.
I used a dark green for the bottom and a sky blue color on the top. Once the base colors were dry I also added a little creek bed with a brown streak of spray paint through the middle of the village floor.
Once your spray paint is all dry, use a sponge to go back and add clouds to the sky.
I also glued rocks to the stream bed...make sure to glue everything down REALLY well because your entire village will be picked up and moved so you don't want things moving around. I also covered all my rocks with glossy mod podge so that they are stuck on really well and it gives them a glossy look.
To give the ground more dimension, I used my sponge to add some bright green paint.
To get your little birdhouses ready for the village, you need to turn them from birdhouses into fairy houses. I used a little dremel to cut the bird holes into doors. I also used scissors to cut off the little rope that comes from the top of the houses.
I sprayed all of my houses with spray paint and then used other paints, scrap booking papers, and random found things to decorate them.
Then comes the fun part - glue your houses down and accessorize, making paths, gardens, etc.
I decorated one house to look like a little mushroom. I also found this cute little fence at JoAnn's - I spray painted it white and bent it so that it forms a little garden full of paper flowers. The little flowerpots are from Michaels. I spray painted them red and glued in some little flowers. I used buttons to make a little pathway to the house.
This little house has a little bunting made from an old road atlas and baker's twine. I also made a pathway using pennies and decorated the house using some copper foil and scrap booking paper.
I decorated a few other houses using small seashells and fake plants. I made another pathway from old scrabble tiles and make a little bridge using a parcel post label. Decorating with all the little bits was my favorite part - I used Aileen's glue to make sure everything was adhered really well so that when the village gets picked up and carried around nothing will shake loose.
To go with your fairy village, Disney makes some cute little 2" plastic figurines available on Amazon...available here.
Image from Amazon.com
And here it is all done!
Thanks for coming by and checking it out!


