Saturday, April 13, 2013

Chevron Quilt Tutorial

Well I finally took the time a few weeks ago to recreate one of my favorite pinterest pins - the Chevron Baby Quilt. 


Ok, so yeah, it's a baby quilt.  And, no...we're not pregnant.  And, no...we're not trying to get pregnant quite yet.  But, it's such a cute quilt so I figure it wouldn't hurt to go ahead and make it.  Plus, the materials were super cheap considering it doesn't take much to make a baby quilt.

I pinned a similar quilt on pinterest a while ago but there was no actual tutorial to go along with it.  So, I made mine up as I went and figured I'd post some instructions.

Here's what you'll need:

1.5 yd gray fabric
1 yd white fabric
2 yd yellow fabric (for the backing)
1 baby quilt size batting - I used the 100% natural cotton kind
2 packages (6yds) white quilt bias tape (you can make your own if you want, but I'm lazy and hate that much ironing/quilting unless I'm using a specific patterned fabric and want to match my bias tape to that)

You'll also want - sewing machine, quilting pins, iron, rotary cutter w/ mat and clear cutting ruler

I made my chevron pattern using triangles - this means my points are not super crisp if you look up close.  However, this was the easiest way I could think of to make this quilt and I don't mind the un-crisp points (or whatever you want to call them).

Finished Size: 36.5" x 52"

Instructions:

PREWASH YOUR FABRIC!!

(1) Cut out your triangle pieces.  I started by cutting my white and gray fabric into 7" x 5" rectangles.  I didn't do perfect squares because I wanted a little bit longer chevron.  Then I cut those squares in half diagonally to get two triangles from each (the triangles have a 7" side and a 5" side that meet to form a right angle).  You'll need between 55 and 65 triangles in each color.

(2) Lay out your triangles to form the chevron pattern.  Don't just try to draw it out in your head - use a big table and lay out your triangles.  Trust me, it gets too confusing to do it otherwise.  My quilt is 5 triangles wide and has a total of 11 rectangle rows (each rectangle row is two triangles put together to form a rectangle).


(3) Sew each of your white and gray triangle pairs together so that you have rows of rectangles that form your pattern.  Anytime to sew two pieces together throughout this pattern, make sure to iron your seams open on the back to keep your edges looking nice.  I used cheaper white and gray fabric so you can see a bit of my unfinished edges through the fabric - I was glad I ironed them all open so they look nice.

(4) Sew the short ends of your rectangles together to form sewn rows.  Once you've sewn all of your rows, then you'll sew them all together to form your quilt top.  I'm sorry - I didn't take pictures as I did this but it's really pretty straightforward.

(5) Once you have your quilt top, you'll want to go along your outside edges and even them out.  I had to trim a few of my edges down so they'd all be even.

(6) Once you have your quilt edges trimmed down, put a 3" strip around your quilt top - I used gray for mine.  Sew the 3" strips around your entire quilt top and iron your seams open. 

(7)  Now you're ready to attach your back and batting.  I used our large coffee table to put my quilt together.  I started by laying my backing fabric out, right side down.  Then I laid out my baby quilt batting on top, then topped it off with my quilt top, right side out.  I used large quilt pins and pinned it all together a lot - I had a pin in every triangle and a number of pins around the edges.


(8) Now to quilt mine, I simply ran it through the machine and lined up the edge of my presser foot along my seam lines where the gray and white met.  I sewed a line on each side of the seam line where the two colors met - this left me with a quilting in a chevron pattern.  I also sort of faked my points by sewing all the way out to a point on the chevron pattern, even though I often didn't have a really sharp point due to the way I pieced the quilt together.


(9) I just used store-bought bias tape around the edges of my quilt to finish it off.  It's easy to also make your own, it just takes a lot of ironing/cutting and I wasn't in the mood for all that.

I like to wash quilts once I make them because I love how the fabric will sort of pucker up a little around the stitches.  I gave mine a good wash once it was all done and considered it good to go!

Enjoy!


Oh and P.S. - when I wasn't looking I hit over 100,000 blog views!  Woo hoo!  We should celebrate!  I'm thinking cake...and wine...and more cake!

Happy Crafting!

Saturday, February 9, 2013

Yoga Bag - A Tutorial!


Sorry it's taken me so long to get this pattern posted...but I promise, it's worth the wait :)  I started going to yoga a month ago and immediately fell in love with it!  I've never been a big fan of working out, but this basic yoga class has been a great way for me to de-stress and get my brain to slow down a few times a week.

So, what would any new hobby/passion be without a little bit of crafting to compliment it?  Hence, the yoga mat bag. 

I found an awesome yoga mat bag on Amy Butler's website.  I'm an Amy Butler addict - I use her fabric more than any other and love the way she mixing patterns and colors.  I loved the pattern but it was pretty simple - I wanted more pockets, everything to be fully lined (including my pockets) and I wanted a bag that zipped open along the length of the mat.  So, this pattern mixes a bit of the Amy Butler pattern with my own design. 

WARNING - this is my first in depth sewing pattern that I've written so it may not be super clear in some parts.  I've tried to take a ton of pictures and if you are really confused, shoot me an email at janesgirldesigns@gmail.com and I'd be happy to try to explain a bit better!


Materials:

1 yd exterior fabric (54" wide mid-weight home decor fabric) - mine is the blue flower fabric (Valori Wells designer fabric)
1 yd interior fabric (44" wide light to mid-weight fabric) - mine is the pink fabric w/ teal dots (Amy Butler)
1/2 yd pocket fabric (44" wide light to mid-weight fabric) - mine is the blue tiki fabric (Amy Butler)
2 - 2" D rings (used to make the strap adjustable)
1 - 36" zipper (parka zipper)
Coordinating Thread
Amy Butler Nigella Yoga Bag Pattern (you will need the circle template from her pattern)

Other supplies:

Sewing machine
Straight pins
Iron
Yard stick/ruler

 (1) Cut out all of your fabric pieces:

From your exterior fabric:
(a) 2 circles from the Amy Butler PDF printable pattern - the printable pattern has half circles; place the flat edge of the pattern on the fold of your fabric to cut out a full circle
(b) 1 Exterior Main Panel: 19" x 28" rectangle
(c) 1 Exterior Pocket: 19" x 12" rectangle
(d) 2 Straps: 1 piece 18" x 8" rectangle; 1 piece 24" x 8" rectangle

From your interior fabric:
(a) 2 circles using your Amy Butler PDF printable pattern (same instructions from your exterior fabric circles)
(b) 1 Interior Main Panel: 19" x 28" rectangle
(c) 1 Interior Pocket Lining: 11" x 20" rectangle

From your Pocket Fabric:
(a) 1 Exterior Pocket Lining: 19" x 13" rectangle
(b) 1 Interior Pocket: 11" x 20" rectangle

(2)  Construct your straps

(a) Start with your 8" x 18" piece of fabric.  Fold one short edge under 1/2", wrong sides together, and iron it down to create a nice finished edge on one short edge of your strap.  Fold the strap in half lengthwise, wrong sides together and iron a center crease, then open up the strap.  Fold each long edge in toward the center and press. 


(b) Then fold the strap in half again at the center crease, enclosing the raw edges, and press it in place.  Top stitch 1/4" in along both long edges and along your finished short edge.


(c) Repeat steps (a) and (b) with your second piece of strap.

(d) Following the instructions on your D-Ring packaging, slide both rings onto the finished edge of your shorter strap.  Fold the finished edge of the strap over, holding the rings into place, and sew in place.


(e) Set your straps aside - you will not need them again until your bag is nearly complete.

(3) Make your exterior pocket

(a) Place the exterior pocket piece and the exterior pocket lining piece right sides together with the long sides lined up on one side (note - the lining piece is slightly larger than the exterior pocket piece, so just line up one one of the long sides).  Sew a line 1/4" in from the long side that is lined up on both pieces of fabric.

(b) Flip the two pieces so that the wrong sides are facing each other.  Line up the opposite long edge and iron in place.  There should be about 1" of your interior fabric along the finished edge (see picture.  Then sew a top stitch 1/4" from the finished, ironed edge.


(c) Line up the unfinished 19" edge along with one of the 19" edges on your exterior main panel.  Your exterior main panel fabric RIGHT side should be facing the pocket lining fabric side of your pocket piece (look at the picture for guidance).  Pin into place.

(d)  Sew 1/4" in along the bottom 19" side, sewing the bottom of your pocket panel onto your bag.  Then mark two lines, 5" in from each shorter side that go straight from the bottom of your pocket up to the top.  I marked mine using chalk.  Next sew along your marked lines straight up from the bottom edge to the top 19" edge of your pocket piece - creating 3 smaller pockets from your one large pocket.


(4) Piece together the exterior panels

(a) Fold the 28" side of your exterior main panel 1/2" under, wrong sides together and press the fabric in place.  Repeat on the other 28" side.  Where you have multiple layers of fabric with your pockets, they should all be ironed under.  Use straight pins to hold those pieces in place if needed.


(b) Attach your straps to your main panel by first folding the two 28" edges toward each other, wrong sides together.  Each side of the strap needs to be pinned right in the middle of where your two 28" edges will line up.  Look to picture to see how to pin straps.  Once pinned in place, sew onto your main panel, 1/4" from edge.


(c)  Your two exterior circles now need to be pinned and then attached to your exterior main panel.  I folded and ironed my circle into quarters and did the same technique on my exterior main panel so that I have 4 ironed creases that I know need to line up.  Sew a line 1/4" away from the edge on each of your 19" edges of your main panel.  Then clip small Vs out of the main panel edge, 1/4" apart.  Do not clip any further than your top stitch.  This will keep your fabric from bunching up or having too much excess around that curved edge.


(d) Pin your circles to the exterior main panel, lining up your folded seams, with the RIGHT sides facing together.  Once pinned into place, sew together using 1/2" seam allowance.  Repeat with one circle on each end.


(e) Once complete, turn your exterior right side out.  Set your completed exterior aside so that you can complete the interior.

(5) Create your interior pocket

(a) Line up your interior pocket and your interior pocket panel pieces, RIGHT sides together.  They are exactly the same size so line up all 4 edges.  Sew along all 4 edges with 1/2" seam allowance, leaving a 3-4" opening along one edge.  Once sewn, flip the entire thing right side out using the opening you left yourself.  Use scissors or a pencil to push out all of your corners.  Iron down all of your corners and sew a top stitch 1/4" from the edge around the entire panel.

(b) Center your pocket panel onto the right side of your interior main panel.  To find the center, I recommend folding your interior panel in half, then in half again and pressing the creases.  Do the same with your pocket piece then line up the ironed creases on both pieces.  The long pieces of your pocket should be parallel with the long pieces of your main interior panel (as shown in the picture).  Pin into place.


(c) Sew along the two shorter edges of your pocket panel then along the iron creases, attaching the pocket piece to your main interior panel and creating 4 interior pockets.

(6) Piece together the interior of your bag

(a) Repeat step 4(a) with the interior piece.

(b) Repeat steps 4(c) and (d) to piece together the remainder of your interior panel.

(7) Attach the zipper

(a) Place your completed interior into the completed exterior of your bag and line up your longer edges with the folded over seams.

(b) Your zipper will go between the exterior and interior pieces on the long edges that have been folded under.  Take your time to slowly and carefully pin your zipper between the two pieces of fabric on both sides and then sew it in place.  I recommend using a zipper foot on your machine to attach the zipper.

(c) To use the D rings on your straps, making them adjustable, place the strap WITHOUT the two D rings attached to it through both D rings.  Loop the strap over the top ring and under the back ring - pull to secure.

And yay - you're done and ready for yoga class!  Here are a few more pictures of the finished bag...


Just a few more notes on my bag.  Yes, the zipper is a bit longer than you need and I could only find one of those double zipper pulls that can zip up each side.  BUT, it works just fine and I just have excess zipper (and that second zipper pull that I never use) stuffed down in between my exterior and lining on one end of my bag so it really doesn't affect my bag at all.

Also, I have a standard size yoga mat and this bag size works great.  I'm able to easily and quickly get my mat in and out of my bag.  I created this pattern with a long opening and zipper because my yoga mat is made with natural rubber so it's extra "sticky" which is great and keeps me from sliding around on it BUT I was afraid that without a big opening it would be a huge pain to try to slide it down into a tube bag with an opening on one end.

My goal is to make a little eye pillow out of coordinating fabric...soon I hope!

Good luck and email me if you have any questions at janesgirldesigns@gmail.com!

Monday, January 21, 2013

Hair Clips Board - a tutorial


Hey ya'll...shoot it's been a loooong time since I posted!  Yet I looked and noticed I'm averaging about 1,000 pageviews per day.  WOW!  I'm not sure how that happened but you won't hear me complaining!

Sorry for being so distant lately!  Here's what I've been up to...


Christmas!

I made a felt playhouse for my nieces - tutorial will be up here eventually (complete with PDF patterns...give me some time to get it all together, but get excited in the meantime!).


I started a new job too!  It's a really great opportunity but also super stressful and oh P.S., I have a tendency to get a little anxious.  Sooo...that has been a bit draining for me over the last month.  But don't fear...I'm still crafting when I'm not completely worn out. 

Here's my most recent projects and one of my favorites so far!  My niece, Maggie, just turned 4...and what else could a big girl want other than???


A hair clip holder! 

I used to have something similar when I was her age and I loved it!  I had a hair clip obsession (my friend Amanda had the most amazing hair clip collection EVER.  I tried to explain this to Mr. JG the other day and how awesome it was...he wasn't as impressed as I'd hoped).


Anyway...Maggie seemed to like it (well as much as a 4 year old really likes anything...tough crowd at that age).

And, I even took a few pictures along the way to create a tutorial...so here goes!


Materials:

Wood Trim - Mine is about 5" wide; I get it unfinished at home depot for $2.98 a ft (this is the same board I used for all of my birthday boards) - you'll need around 1 ft for this job (I used 14" to be exact)

Spray Paint (orange for mine; you can also use acrylic paint but I love spray paint because it's really quick and easy, no brush marks, and leaves a nice shiny finish)

White vinyl & a Cricut to cut the letters (no cricut?  no worries - consider buying pre-cut letters, hand painting them on yourself, or using stencils and paint to do the job)

A couple of cute ribbons

Little saw tooth hangers and extra little bitty nails (there's always one or two extra in a saw tooth hanger package and I used these for all of the birthday boards I sold so I had quite a few extra that I just used)

Glue (Aleene's Tacky Glue is my fav!  At Maggie's birthday party my sister made the mistake of asking me when to use hot glue v. white glue...she got a 10 minute long answer)

You'll also need - a hammer, a lighter/match, a place to spray paint where you won't accidently paint something like carpet (I spray paint outside on a tarp that just lives on our back patio)


Okay - got everything together?  Here we go!

Wait, hold on a minute....just a note about cutting your trim piece.  At Home Depot they sell this stuff by the yard, so you can just grab a long piece then walk up to that little cutting cart in the aisle and cut it down to size.  I don't do this and don't recommend it if you can help it.  Those hand saws at Home Depot suck!  They have been on that cart cutting wood since the dawn of time and are never sharpened so you're edges end up looking crappy.  I always buy a slightly longer piece and then take it home and cut it with my chop saw.  If you have a chop saw - do this...your edges will look much nicer and you'll be glad you did!

(1) Spray paint your board!  Give it a few coats and hit it from all angles so you get all the edges.


(2) Cut out your vinyl letters on your cricut and apply them to your board.  Or hand paint your letters if you don't have the cricut option.  For my trim piece, my larger letters were 3" tall and my smaller letters were 1" tall.  Oh and you're basically just flipping the trim upside down for this project so the part that would normally be the decorative top edge of your trim becomes the bottom decorative edge of your hair clip holder.

(3) Cut 3 lengths of ribbon (mine were all about 2ft long) - cut them all the same length.  Then, using your match/lighter, run the cut edges of your ribbon barely over the flame to sort of seal them in so they won't fray.  I usually light a candle then hold mine over the candle flame.  You have to be careful (especially with a light colored ribbon) not to singe the ribbon by getting it too close to the heat.

(4)  Glue the ribbon to the back of the board.  I measured my board, found the center first, and glued my center ribbon down.  Then I just glued the other two ribbons down equi-distant from the center.


(5)  Once your glue is dry, nail little nails through the ribbon into the back of the board.  Make sure your nails aren't too long and they won't poke through the other side (it takes really small nails).  These will help hold your ribbons on even if your glue gives up.  I never trust glue.


(6)  Nail on your sawtooth hangers.


(7) Add your hair clips and hang 'er up!  All done!


Let me know if you make one - I'd love to see how yours comes out!

Monday, December 3, 2012

Christmas Crafting

WARNING - if your name is Molly or Maggie and you are age 2 or 3 and you are my niece, please do not read on further...it will ruin any Christmas surprise.

I love handmade gifts for Christmas, especially for kids.  I've learned that kids have a ton of toys, so mixing in some handmade goodies is usually a hit for parents and kids alike.  I've started crafting my nieces' Christmas present - it's going to be a felt playhouse that lays over a card table.  Here are a few examples I've seen online...

The CupCakery Card Table Playhouse, White Scalloped Roof, Brighter Colors, Custom Order, Personalized, 40 removable and replaceable pieces

Felt Card Table Playhouse,  Construction Site, Personalized, Custom Order
These are both from this cute Etsy shop, http://www.etsy.com/shop/missprettypretty?ref=seller_info.

I figured I'd try my hand at my own design this year.  JoAnn's had a great sale on 72" felt - half price - the weekend after Thanksgiving, so I stocked up!

Here's what I have so far...

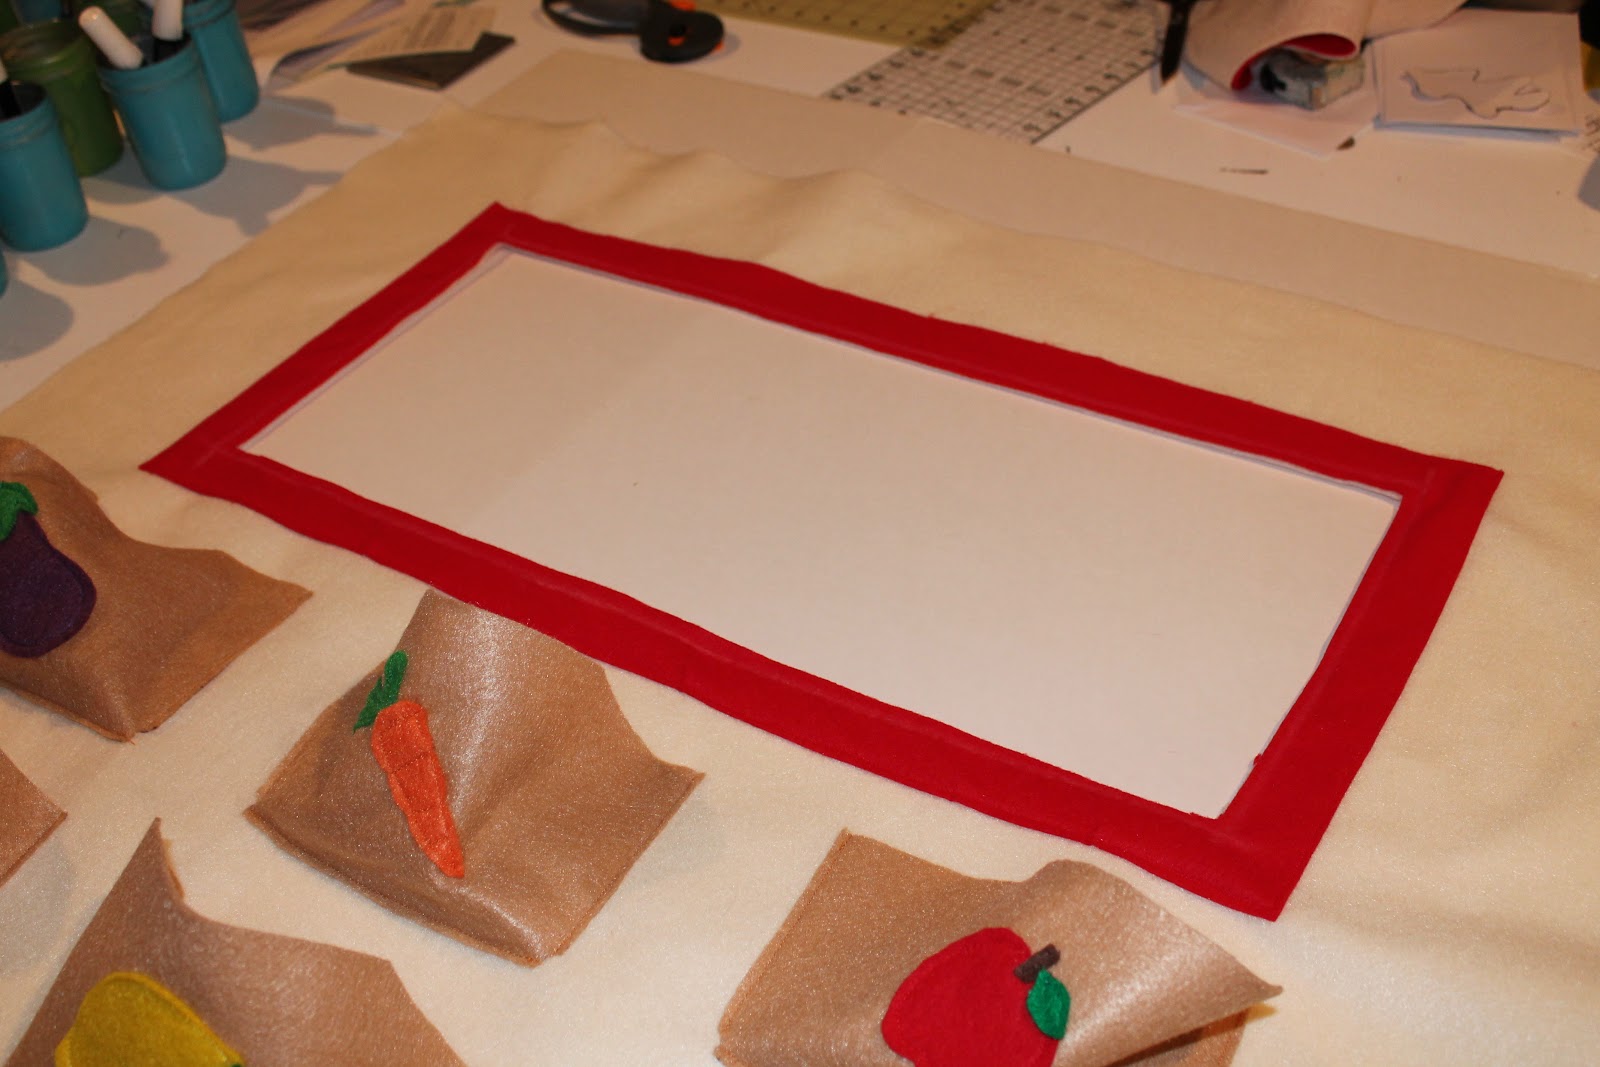
Little three-dimensional baskets to hold felt fruit and veggies

I cut an opening above the baskets to create a little outdoor market

Little lettuce bundles for the grocery/market

Cupcakes for the bakery

The bakery wall.  The cupcakes are all attached with Velcro so that they sit on the shelves but can be taken off to sell (the white paper is the guide of where I'll cut out a window).

As you can see...this is a work in progress and I still have two more walls to complete before Christmas.  But, I'm loving how it's coming out so far!

Are you making any handmade gifts this Christmas?

Saturday, December 1, 2012

Hot Chocolate and an Art Sale

How's your Saturday going?  I'm going to spend the rest of mine finishing a grant report for our community garden (it's due today...nothing like waiting until the last minute).

However, I was able to see a friend for lunch and head out to Lawrence for an Art Sale & Open House.  Ryan Paget was selling his pottery and paintings.  Everything was beautiful and I had a really hard time picking just a few items.  This may be my favorite purchase...


A perfect little mug. 

I'm off to enjoy my hot chocolate and finish my grant report.  Enjoy your Saturday!

Friday, November 30, 2012

Seriously...

I don't know about you, but I'm so glad it's Friday.  I wish I could have just stayed in bed today.


Petey agrees.

Tuesday, November 27, 2012

A Pinterest Inspired Laundry Room


We've been slowly working on making our laundry room a little cuter, so I thought I'd show our few projects thus far.

I made the very pinterest inspired faux metal letters...


They were super simple to make...just simple paper mache letters from the craft store, spray paint them with silver metallic paint, then sand to give them an aged look.  Mr. JG hung them (I'm thinking he had to drill holes in the back of the letters to get them to hang...but who knows, that's his deal).

Speaking of Mr. JG - he also made this awesome dryer stand while I was out of town a few months ago...


It is of course very pinterest inspired...here's the original link and tutorial that he used:

http://ana-white.com/2011/01/sausha%E2%80%99s-washerdryer-pedestals

He had to make ours a bit shorter so that our washer could still fit under our built in cabinets.  This meant a rather long search to find some shorter baskets that would fit (eventually Hobby Lobby delivered).  I added some vinyl letters and we were set!


Oh and no, I don't have wild birds flying around my house that feed in my laundry room.  I hang my feeders in here during the winter so they won't get damaged/frozen outside.

So go...make your own laundry pedestal (or maybe just faux metal letters...those are a lot easier).