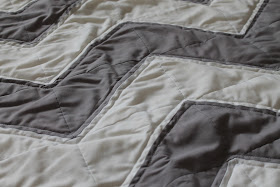
Ok, so yeah, it's a baby quilt. And, no...we're not pregnant. And, no...we're not trying to get pregnant quite yet. But, it's such a cute quilt so I figure it wouldn't hurt to go ahead and make it. Plus, the materials were super cheap considering it doesn't take much to make a baby quilt.
I pinned a similar quilt on pinterest a while ago but there was no actual tutorial to go along with it. So, I made mine up as I went and figured I'd post some instructions.
Here's what you'll need:
1.5 yd gray fabric
1 yd white fabric
2 yd yellow fabric (for the backing)
1 baby quilt size batting - I used the 100% natural cotton kind
2 packages (6yds) white quilt bias tape (you can make your own if you want, but I'm lazy and hate that much ironing/quilting unless I'm using a specific patterned fabric and want to match my bias tape to that)
You'll also want - sewing machine, quilting pins, iron, rotary cutter w/ mat and clear cutting ruler
I made my chevron pattern using triangles - this means my points are not super crisp if you look up close. However, this was the easiest way I could think of to make this quilt and I don't mind the un-crisp points (or whatever you want to call them).
Finished Size: 36.5" x 52"
Instructions:
PREWASH YOUR FABRIC!!
(1) Cut out your triangle pieces. I started by cutting my white and gray fabric into 7" x 5" rectangles. I didn't do perfect squares because I wanted a little bit longer chevron. Then I cut those squares in half diagonally to get two triangles from each (the triangles have a 7" side and a 5" side that meet to form a right angle). You'll need between 55 and 65 triangles in each color.
(2) Lay out your triangles to form the chevron pattern. Don't just try to draw it out in your head - use a big table and lay out your triangles. Trust me, it gets too confusing to do it otherwise. My quilt is 5 triangles wide and has a total of 11 rectangle rows (each rectangle row is two triangles put together to form a rectangle).
(3) Sew each of your white and gray triangle pairs together so that you have rows of rectangles that form your pattern. Anytime to sew two pieces together throughout this pattern, make sure to iron your seams open on the back to keep your edges looking nice. I used cheaper white and gray fabric so you can see a bit of my unfinished edges through the fabric - I was glad I ironed them all open so they look nice.
(4) Sew the short ends of your rectangles together to form sewn rows. Once you've sewn all of your rows, then you'll sew them all together to form your quilt top. I'm sorry - I didn't take pictures as I did this but it's really pretty straightforward.
(5) Once you have your quilt top, you'll want to go along your outside edges and even them out. I had to trim a few of my edges down so they'd all be even.
(6) Once you have your quilt edges trimmed down, put a 3" strip around your quilt top - I used gray for mine. Sew the 3" strips around your entire quilt top and iron your seams open.
(7) Now you're ready to attach your back and batting. I used our large coffee table to put my quilt together. I started by laying my backing fabric out, right side down. Then I laid out my baby quilt batting on top, then topped it off with my quilt top, right side out. I used large quilt pins and pinned it all together a lot - I had a pin in every triangle and a number of pins around the edges.
(8) Now to quilt mine, I simply ran it through the machine and lined up the edge of my presser foot along my seam lines where the gray and white met. I sewed a line on each side of the seam line where the two colors met - this left me with a quilting in a chevron pattern. I also sort of faked my points by sewing all the way out to a point on the chevron pattern, even though I often didn't have a really sharp point due to the way I pieced the quilt together.
(9) I just used store-bought bias tape around the edges of my quilt to finish it off. It's easy to also make your own, it just takes a lot of ironing/cutting and I wasn't in the mood for all that.
I like to wash quilts once I make them because I love how the fabric will sort of pucker up a little around the stitches. I gave mine a good wash once it was all done and considered it good to go!
Enjoy!
Oh and P.S. - when I wasn't looking I hit over 100,000 blog views! Woo hoo! We should celebrate! I'm thinking cake...and wine...and more cake!
Happy Crafting!


We could really use step by step directions on how you made the chevron pattern with the triangles, we can't figure it out.
ReplyDeletePlease help! I can't get any of the lines to line up! Really want to make this as a baby shower present.
ReplyDeleteLadies watch jenny from Missouri star quilt co on you tube. She does a great tutorial with the half square triangles to make the chevron ����
ReplyDeleteLove the pattern! Thanks for sharing! Just a quick note: keep in mind the triangles need to be cut half in one direction and half in the other as they are not symmetrical (e.g. cut half the rectangles with right side up and half with right side down.) Hope this helps some of those having trouble with creating the chevron stripes. - Kelsey
ReplyDelete